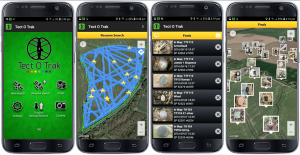
Tect O Trak is a fully resumable Android Gps track and finds recording application. This is my own personal project to develop a useful app specifically designed for metal detecting.
This application allows the user to build a permanent record of their movements and finds. Search sessions can be saved and resumed from the exact spot you left off at a later date. Additionally, you can also mark find spots, and keep detailed photographic records of your finds. There are two types of camera. There is a ‘clodcam’ used when recording the moment of discovery. There is also a dedicated desktop camera and gallery. This is where you can showcase all your best and cleaned finds.
Tect O Trak is most suitable for the serious long term detectorist who will keep returning to a permission over many seasons and years. This app is all about reliability and longevity. Over time, your database will become increasingly invaluable and irreplaceable to you. Keeping the database safe and up to date is an absolute priority. This has been made as easy as possible with a one-click Backup/Restore tool. It is best practice to create a back up after every session and allow Tect O Trak to be included when syncing with your cloud storage.
There is a section towards the bottom of this page, dedicated to this extremely vital function. Following the correct procedure will make your records indestructible, giving you a helpful and reliable journal for many years to come
Get a fully functional free version here:- http://play.google.com/store/apps/tectotraklite
Or, help support further development of Tect O Trak by purchasing an enhanced supporters version here:- https://play.google.com/store/apps/tectotrak
Permission Declaration
Background location usage and data access
This app (Tect O Trak) is designed to track and record the user’s movements within the boundaries of a user-defined search area. The track recording feature will require permission to run location services unmonitored in the background for long periods.
Tect O Trak also needs permission to access photos, media and files. This is for photograph/image management which is essential for building a photographic journal type database.
Tect O Trak does not access, seek to access, or require sensitive user information.
All data is stored only locally to this device, No data is gathered, monitored, uploaded, collected, shared, or viewable to anyone but the user. All data is strictly private and confidential.
ULTRA IMPORTANT! Allowing Tect O Trak to run in the background.
If the app stops track recording when the screen goes off… This is because your device has put the app to sleep to save battery. Depending on your device, the most common fix is to disable battery optimisation for this app. Go to:- Settings/ Apps/Tect O Trak/Battery and remove Tect O Trak from the ‘Optimised Apps’ list. Optimised apps are put to sleep when the screen turns off. Different devices may use different terminology and paths so you may have to research your particular device. A good place to start and will give you an understanding of the issue is:- https://dontkillmyapp.com
Samsung devices using Android 11 will prevent apps from working in the background by default unless you exclude apps from battery optimizations. To make Tect O Trak work properly, make sure you enable Settings > Apps > Tect O Trak > Battery > Battery optimization > All apps > Tect O Trak > Don’t optimize.
HUAWEI smartphones aggressively close apps when you lock the screen.
Please adjust your device settings to allow Tect O Trak to run in the background. Learn how:- https://www.digitalcitizen.life/stop-huawei-from-closing-apps
****
A personal message from the author
I am not a professional developer. My interest is purely in metal detecting. Although I am the designer, I have to hire people to do the actual hard coding. If you like Tect O Trak, please show your support by purchasing the app, also leaving a review for ‘ naysayers’ at the playstore. This will go some way towards helping me develop the app further. I have lots more innovative ideas to implement, all dedicated to the specialised needs of the detectorist. With a little support from the community, it will be interesting to see how far I can take it.
****
How Tect O Trak can help you.
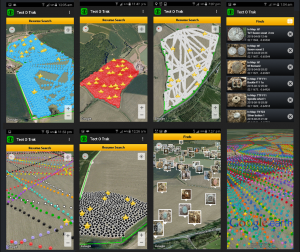
What is it that your hoping this app can do? As good as GPS is, it is hardly ever 100% accurate, and you could be a metre or so out at any given moment. However, this doesn’t mean GPS tracking has no use for the metal detectorist. We just need a strategy! For example, tracking yourself ‘freestyle’ roaming will only give you limited information when it comes to resuming a search in the future. To get the best out of GPS, you need to be methodical and keep your lines straight. Don’t start tracking/detecting until you are in position, and remember to stop tracking/stop detecting when you’re done. Adopting this technique will give you a useful, permanent record of your outings.
Strategy.
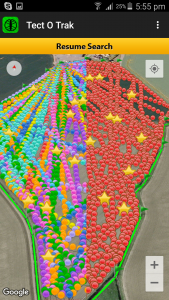
I have been using Tect O Trak for over seven years now, and I have experimented with all types of search pattern strategies. I have found that the absolute best way to use the app, is to apply a technique I call ‘The bounce’. To do this, from your starting point, select a distant target to aim at such as a tree or a gap in the hedge or anything you can fix on. Now select a middle distance target directly in line with the far target then simply walk in a straight line towards them always keeping both targets dead in line, Think of it as looking down the sights of a rifle… The slightest deviation from course will put the far marker out of line. You will need to update the middle distance target as you go along. It’s a continuous process. Always be ready to change to a new middle target as they become visible. Once you have reached the other side of your search area, stop, turn around pause for a moment and choose another set of targets to aim for and carry on ad infinitum. Using this method, not only will it give you the most accurate tracking and cleanest lines, but also makes it a lot easier for you to find a new ‘clean’ line as the map starts getting crowded with all your previously recorded tracks, especially when used in conjunction with the ‘Pathfinder’ tool,
USER GUIDE
GPS/Locating method.
Set to high accuracy ( with network support) for the best results
Calibrate the compass.
A potential issue with your GPS accuracy is an improperly calibrated compass. If this is the case, your device is getting improper orientation information which can cause issues when using navigational apps. In order to fix this, you’ll need to calibrate your Android’s compass.
Ideally, you should turn on both GPS and Tect O Trak at least five minutes before you actually start detecting, and let it track you as you walk to your starting point. This will give the GPS time to settle and get a good moving fix on you. You will also benefit from a more accurate starting point.
Map view controls.
Zoom to position = Target button top right.
Move map sideways = touch screen and drag.
Zoom in/out = Double tap screen but leave the second tap down, then slide up to zoom in, or slide down to zoom out. OR… Touch screen with two fingers then widen to zoom in or narrow to zoom our
Rotate = Touch screen with two fingers then rotate.
’3D’ Tilt view = Two fingers on screen then slide up or down to suit. ( This is more noticeable at low altitude)

New search
The first thing you will need to do before you can start recording your tracks is to create a search area by marking out and outlining the area you intend to search. This action will also cache the required maps for future offline use.
BE SMART! It’s always best practice to mark out your intended search area before you leave home. This will save you valuable detecting time, save on data usage, and guarantee the maps are there when you need them. This is especially important if you are going somewhere new and you can’t be sure of a network connection.
New search
From the startup screen, select ‘New search’ and Google satellite maps will appear. Now from the menu select ‘Set area markers’ (you will then need to give the search area a name) To lay the first marker (in a corner for example) tap the screen. A marker will appear. This marker is immovable. Be accurate as you can be. Zoom in if you need to, but make sure you get the first marker right! You can then proceed to outline the search area by adding further markers. , These can be moved around for precision placement by holding down the marker until it becomes active and dragging to position. If you make a mistake, simply press ‘back’ to go back one step. There is no need to completely close off the search area as this is done automatically by going to the menu, and pressing ‘Finalise area’. This will connect the first marker to the last. You are now ready to go. Press ‘Start tracking’ and you’re off!
You can view a demonstration video showing how to create a new search area and the find recording process here as well as other instructional videos here:- https://www.youtube.com/watch?v=uu2J29R3pg4
Resume search.
To resume a previous search. On the startup screen, press the ‘Resume search’ icon. Then, from the menu click ‘Search areas’. When you are position and ready to continue from where you left off, from the menu, press ‘Start tracking’. Saving is automatic. Just exit the programme when you’re done.
Rename a search area.
Long press the individual saved search area record to enable edit mode.
Recording finds.
When you make a find that you want to record. In the menu select, ‘Record a find’. You have the choice of entering the location automatically (by GPS) or manually (by sight) positioning, The latter being more accurate. Enter any details about the find, press OK then touch the screen to place a star marker. As with the area border markers, to be extra precise, hold the star marker down until it becomes active, then drag it to the exact spot. Once the maker has been placed you can continue on your way. Saving is done automatically.
Editing find records
Long press the individual record to edit a finds name, its description, or to add or replace a photo.
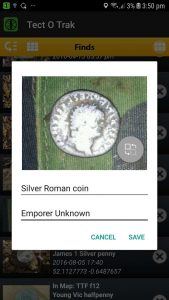
Only the title will be displayed in the finds list. To see the full title and description, tap the thumbnail to view the full-size image, then click the I info icon in the top left corner
Manually add tracks.
There is an option for the user to enter their tracks manually, and make records from memory at their convenience. To do this, go to:- menu/ start tracking/ Add a track. Position the screen, and tap the screen to lay tracks.
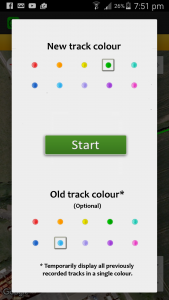
Multi–colour tracks.
Click ‘Start tracking’ and a list of available colours will appear. Select the colour you want the track to be. To change colour mid-search, simply stop/pause track recording, then resume ( ‘Start tracking’) and select a new colour.
There is also an option to temporarily display all old tracks in a single colour of your choice, while at the same time allowing a high contrasting custom colour selection for the new track.
Import overlay. This feature enables the user to overlay a screenshot or image over a search area for example an old map. To do this:-First, open a search area then click the compass top left to align the map N/S and position the map view so that your search area is perfectly in the centred. Make it big as you can.Now escape/minimise the app and visit a map source. A good one for UK users is :- https://maps.nls.uk/geo/find/#zoom=7&lat=52.68428&lon=-2.01101&layers=101&b=1&z=1&point=0,0
Now find that exact same view. By default, the maps are aligned North/South. This is why you should align the search area view North/South too. It makes it much quicker to get a precise overlay.
Once you have found the perfectly centred and sized view, take a screenshot. It is best if you crop it immediately using the better cropping tool available in the android system. You can crop it within the app later if you wish but it doesn’t give you as much flexibility as the system tool.
Now go back to the app and from the menu select ‘Import overlay’ then from files select your screenshot.
This will overlay the screenshot over the search area. Use the controls to align the layers, When you are happy, click the padlock to lock it in place. Click the padlock again to unlock it. Use the bin to delete the overlay. You will be given the opportunity to save the overlay for future use and included it in backup/restores as part of the main database.
You can use this feature to overlay an old map or LIDAR images, or just a helpful grid and should prove very useful.
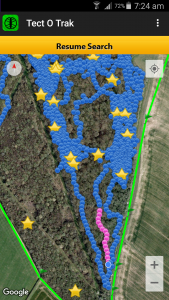
Pathfinder. (Beta)
At first, you will have no difficulty in finding a nice clear path to take as your lines will be wide apart, but over time it will become increasingly difficult to decide which is the best line to take. The ‘Pathfinder’ tool can help find the best/cleanest line.
Unfortunately, because of the time of year, my permissions are closed, so the screenshots below are from the comfort and warmth of my computer chair, but it will give you an idea of what it looks like:-


To initiate the Pathfinder tool:- Firstly make sure you have a location fix and the GPS position cursor is showing. Long press the screen, and a black line and a yellow marker will appear. Long press the yellow marker to make it active; (long press it again to remove it) and drag it around until you find a line you want to take. Now tap the marker and a white compass line will appear. The map will also auto-rotate to vertical. (This is so that the top of your device will always be the direction you will need to walk) Now slowly turn around until the lines merge into one, and shows red. Now look over the top of your phone and follow that line with your eyes to the other side of the field and select a target to aim at. You can now put your phone back in your pocket. You have your next line! Please note that the Pathfinder will only work when you are in tracking (record) mode.
Pathfinder Accuracy.
This will depend on your device’s own compass. Make sure you calibrate it regularly. You can also further maximise the compass bearing accuracy by following these simple steps:- Firstly you will need to be in full track recording mode with the position cursor accurately fixed on your position. Now in the real world, look around you and choose a target you can clearly see. Now, holding the phone level, use the Pathfinder tool to set a bearing to that target and align the bearing line with the compass needle. You may (or may not) notice that it is slightly off to what your eyes in the real world are telling you. You can correct this deviation by either slightly tilting the phone backwards or forwards. When you see that everything lines up on the screen and in the real world, take a mental note of the tilt position. This is your devices own unique magnetic deviation, you should remember and use that tilt position when taking any future bearings. It is actually set to 15 degrees from horizontal (the top slightly tilted towards you) however, individual devices may differ, so it is always best to run your own benchmark tests.
There is a video demonstration of this tool here:-Using the Pathfinder tool to find your next line.
Backup.
I cannot stress enough how important it is to regularly backup your database and keep a copy of it on your PC or Cloud drive. Anything could happen to your device at any time. Imagine how you would feel if you lost 3 years, or even just one week’s worth of records? You will be gutted, I assure you! Only keeping a backup on your device is risky and not good enough!!
To create a 100% bulletproof backup of Tect O Trak, please follow these steps:-
Start by clicking the Export/backup/restore and create a backup. Now connect your device to your PC, open it, and look for the Tect O Trak folder. Now copy the whole Tect O Trak folder onto your desktop. It’s good practice to then zip it and give it a date. Just to be completely safe, keep another copy in your cloud storage.
An even easier way to ‘back up your back up’, is to find the Tect O Trak folder on your phone, then long-press the folder until the ‘Copy’ option appears. Depending on what services and apps you use, you will get a variety of destinations to copy the folder to. Choose one that you can access at any time. All this takes less than a minute. Be smart and play it safe.
Please note that it is not necessary to include the KML folder. A new one can be recreated at any time. They can get quite big, and will just take space and lengthen upload time unnecessarily.
Restore.
To do a complete restore, including images assuming you created a proper backup as advised… Please follow these steps:-
Install Tect O Trak if not already installed. Now connect your device to your PC, open the device and look for main Tect O Trak folder. Now go back to your PC and drag/copy your stored copy of the folder onto your device and replace the folder already there. Disconnect your device and start Tect O Trak. Click the Export/backup/restore, button and select ‘Restore’. Be advised this will overwrite the current working database (if there is one..) Your database should now be completely restored.
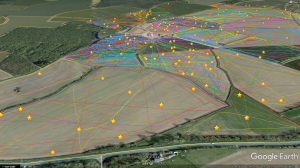
Exporting kml files to Google Earth
On the home screen press ‘Back up/Restore. Select ‘Export kml.’ This will create the files and a new folder (kml) in the main Tect O Trak folder. Copy the kml folder onto your PC. View your tracks by clicking on any or all of kml files contained within the folder, or open google earth and drag and drop.
Global location gallery. Just have a play!

Camera(s).
There are two types of camera function. The desktop camera is designed to be a stand-alone showcase for all your cleaned and presented finds. Only your best pictures go in here!
There is also a ‘clodcam’ (Finds camera) This is used when recording and marking a find, and also creates a thumbnail for your finds record list.
Battery usage.
It’s a common misconception that GPS drains batteries. GPS is just a radio signal. What actually does use battery is ‘screen on’ time. To get the most out of your battery for a long session, keep screen time to a minimum.
It is my experience that a fully charged battery will last about 6 hours. Personally, I carry a power bank and top the battery up whenever I stop to take a break.
Upgrading from free to supporters version
To keep records made with the free version when upgrading, simply make a backup. Then after installing the supporter’s version, run the app and click ‘Restore’
For a list of FAQ’s please click here
Thank you for supporting Tect O Trak. I would love to hear how you get on, and also of any ideas you may have to improve it or would like to see added.
Happy Hunting & Good luck!
Mark S.
97 Responses to Tect O Trak (Android)